Want to build a login form for your website without touching a JavaScript library or a UI framework? Good news: HTML and CSS are all you need.
This guide walks you through building a clean, centered login form from scratch. A login form that is well-structured not only draws attention to the attractive elegance of the website, but it also helps you polish your coding skills in HTML and CSS.
Step by step, we will look at the necessary HTML and CSS elements for layout and styling something very special. This article will impart crucial tips and working examples to help you become an expert in the stunning art of creating the login form. So let’s get into creating a login that will always facilitate positive memories with your visitors!
What You’ll Learn
- How to structure a login form with semantic HTML
- How to style the form using CSS flexbox, colors, and fonts
- How to create a responsive and accessible login interface
- Tips to make your login form stand out
Steps to Create Website Login Form
Step 1: Setup Your Project
Create a folder for your project. Inside the folder, create two files:
index.html— This will contain the HTML markupstyle.css— This will hold your CSS styling
Step 2: Write the HTML Markup
To start, add the following HTML codes to your index.html file: This code includes essential HTML markup with different semantic tags like<form>, <div>,<a>,<label>, <button> to create the login form layout.
index.html
<!DOCTYPE html>
<html lang="en">
<head>
    <meta charset="UTF-8">
    <meta name="viewport" content="width=device-width, initial-scale=1.0">
    <title>Document</title>
</head>
<body>

<form class="form">
    <p class="form-title">Sign in to your account</p>
     <div class="input-container">
       <input type="email" placeholder="Enter email">
       <span>
       </span>
   </div>
   <div class="input-container">
       <input type="password" placeholder="Enter password">
     </div>
      <button type="submit" class="submit">
     Sign in
   </button>

   <p class="signup-link">
     No account?
     <a href="">Sign up</a>
   </p>
</form>

</body>
</html>
Step 3: Add CSS Styling
Now add the following styles to your style.css file to create an attractive and centered login form:
style.css
body{
            display: flex;
            justify-content: center;
            align-items: center;
            height: 100vh;
            background-color: navy;        }
        .form {
            background-color: #fff;
            display: block;
            padding: 1rem;
            max-width: 350px;
            border-radius: 0.5rem;
            box-shadow: 0 10px 15px -3px rgba(0, 0, 0, 0.1), 0 4px 6px -2px              rgba(0, 0, 0, 0.05);
          }

          .form-title {
            font-size: 1.25rem;
            line-height: 1.75rem;
            font-weight: 600;
            text-align: center;
            color: #000;
          }

          .input-container {
            position: relative;
          }

          .input-container input, .form button {
            outline: none;
            border: 1px solid #e5e7eb;
            margin: 8px 0;
          }

          .input-container input {
            background-color: #fff;
            padding: 1rem;
            padding-right: 3rem;
            font-size: 0.875rem;
            line-height: 1.25rem;
            width: 300px;
            border-radius: 0.5rem;
            box-shadow: 0 1px 2px 0 rgba(0, 0, 0, 0.05);
          }

          .submit {
            display: block;
            padding-top: 0.75rem;
            padding-bottom: 0.75rem;
            padding-left: 1.25rem;
            padding-right: 1.25rem;
            background-color: #4F46E5;
            color: #ffffff;
            font-size: 0.875rem;
            line-height: 1.25rem;
            font-weight: 500;
            width: 100%;
            border-radius: 0.5rem;
            text-transform: uppercase;
          }

          .signup-link {
            color: #6B7280;
            font-size: 0.875rem;
            line-height: 1.25rem;
            text-align: center;
          }

          .signup-link a {
            text-decoration: underline;
          }
Step 4: Preview Your Login Form
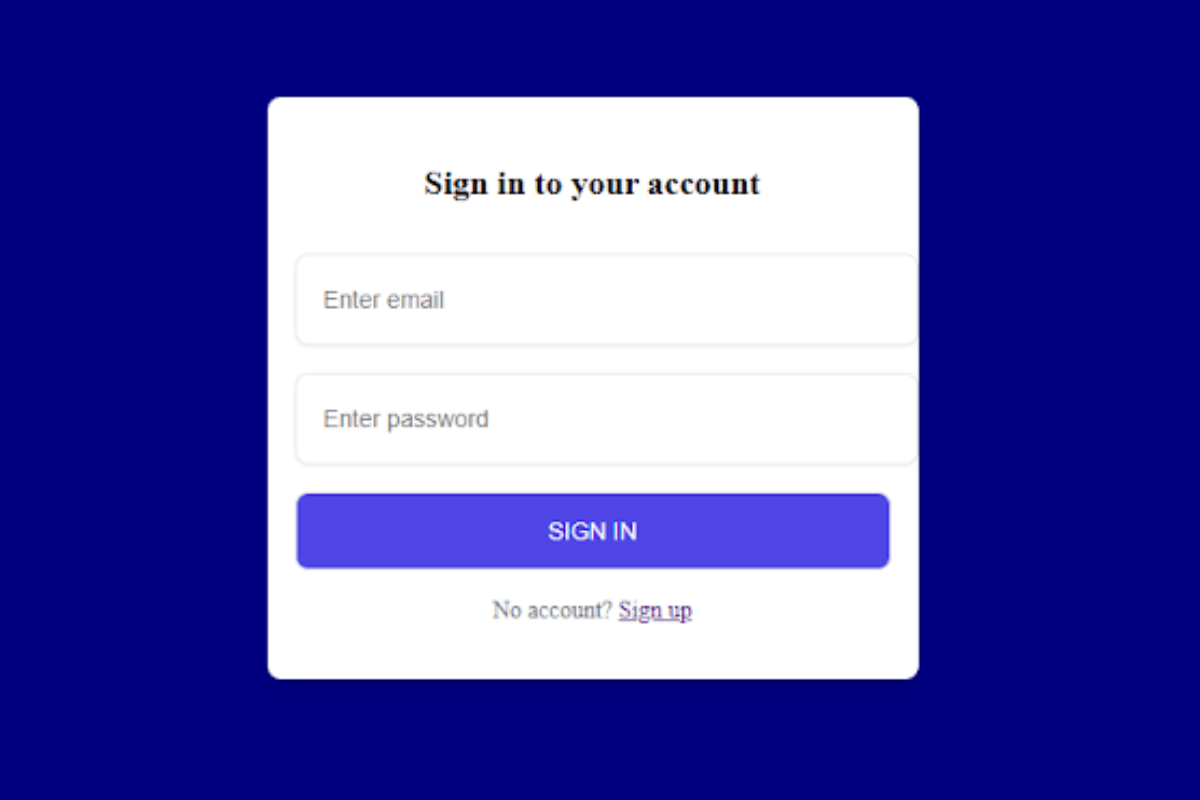
Open your index.html file in a browser or use the Live Server extension in VS Code to see your styled login form in action.
Conclusion
You’ve just created a simple login form using only HTML and CSS. This form is accessible, responsive, and ready to be integrated into any website or project. By following this guide, you have successfully created a modern and stylish login form.
Happy coding!
check also: Create a Simple Sidebar Menu